Friday, November 8, 2013

Nginx multiple sites in subdirectories

I recently started using Nginx server which seems to provide the best security options and also the highest performance for the websites. As I migrated from XAMPP which is one of the simplest ones to setup, I found it hard to setup multiple sites in subdirectories using Nginx. As I struggled to find out the correct configuration for setting it up, I thought it deserved a blog post and here it is.

I was trying to setup three websites under the root folder (in my case /usr/share/nginx/www) in an Ubuntu server and all of them are PHP based site. One is PHPMyAdmin, the other is an yii based PHP website and another website with a single PHP file(an API for a mobile app). You can start with the default config file in /etc/nginx/sites-available folder and use fast-cgi configuration for the PHP files. A typical configuration for a PHP site would look like this,


server {
    listen 80 default;
    server_name localhost;

    access_log /var/log/nginx/access.log;

    root /usr/share/nginx/www;
    index index.php index.html;

    location ~ \.php$ {
        fastcgi_pass unix:/var/run/php5-fpm.sock;
        fastcgi_index  index.php;
        include fastcgi_params;
        fastcgi_param SCRIPT_FILENAME $document_root$fastcgi_script_name;
    }
}
If we have to setup multiple sites as sub-directories we need to define multiple location elements in the same config file as below. 

For my yii Site1,

 location /Site1/ {
                root /usr/share/nginx/www/Site1;
               try_files $uri $uri/ /index.php?$query_string;
        }

        # the images need a seperate entry as we dont want to concatenate that with index.php      
        location ~ /Site1/.+\.(jpg|jpeg|gif|css|png|js|ico|xml)$ {
                root /usr/share/nginx/www/Site1;
        }
        # pass the PHP scripts to FastCGI server
        location ~ /Site1/.+\.php$ {
                fastcgi_split_path_info ^(.+\.php)(/.+)$;
                allow 127.0.0.1;
        #       # NOTE: You should have "cgi.fix_pathinfo = 0;" in php.ini
        #       # With php5-fpm:
                fastcgi_pass unix:/var/run/php5-fpm.sock;
                include fastcgi_params;
                fastcgi_param SCRIPT_FILENAME $document_root$fastcgi_script_name;
                fastcgi_index index.php;
        }
For the phpmyadmin Site

  location /phpmyadmin/ {
                root /usr/share/nginx/www/phpmyadmin;
               try_files $uri $uri/ /index.php?$query_string;
        }

        # the image url for this site were including the folder so we can ignore that and provide root     
        location ~ /phpmyadmin/.+\.(jpg|jpeg|gif|css|png|js|ico|xml)$ {
                root /usr/share/nginx/www;
        }
        
        # pass the PHP scripts to FastCGI server
        location ~ /phpmyadmin/.+\.php$ {
                fastcgi_split_path_info ^(.+\.php)(/.+)$;
                allow 127.0.0.1;
        #       # NOTE: You should have "cgi.fix_pathinfo = 0;" in php.ini
        #       # With php5-fpm:
                fastcgi_pass unix:/var/run/php5-fpm.sock;
                include fastcgi_params;
                fastcgi_param SCRIPT_FILENAME $document_root$fastcgi_script_name;
                fastcgi_index index.php;
        }
For Site3, which is just a single php file and does not have any images


 location /Site3/ {
                root    /usr/share/nginx/www/Site3;
        }

        # pass the PHP scripts to FastCGI server
        location ~ /Site3/.+\.php$ {
                allow 127.0.0.1;
                fastcgi_pass unix:/var/run/php5-fpm.sock;
                include fastcgi_params;
                #we are directly using the $request_filename as its a single php script
                fastcgi_param SCRIPT_FILENAME $request_filename;
        }
Hope this helps someone who is having similar issues with setting up subdirectories for multiple sites. This is still not as straight forward as Xampp is but once we figure it out, its lot simple and everytime we add a subdirectory we can copy over the location settings.
Saturday, July 20, 2013

Nexus 7 emulator launcher error

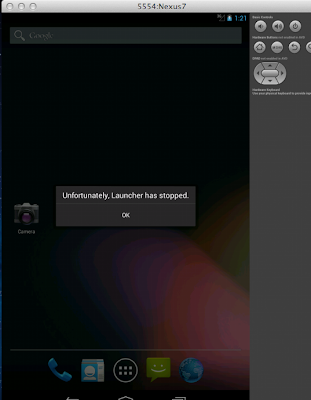
You started a Nexus 7 emulator on your Mac or Windows system and struggling to get rid of the launcher error that says "Unfortunately launcher has stopped".  

Launcher error

Yes its unfortunate and it looks stupid(at-least to me) to drag the "Custom Locale" icon to home screen to get rid of this error. You have to drag the icon as shown below to the home screen

Hold and drag the Custom Locale icon
Then drag it all the way to home screen.

Place it anywhere you like in this screen
Now everything should work fine in the emulator.  I was wondering if this deserved a blog post, but I wasted at-least half and hour finding out why it crashed as I directly ran my app and was modifying different things in my app to see if it was failing because of my app.


Monday, July 15, 2013

Calabash-ios on Windows

In the last post I discussed about setting up the Mac environment for running Calabash-ios tests from Xamarin studio. In Mac, we can run the calabash-tests on simulator easily by using the Fast Track steps if using Xcode or by using these steps if using Xamarin studio. To run on a device in mac we need to identify the device ip address  and use it in the terminal like this

DEVICE_ENDPOINT=http://192.168.1.146:37265 NO_LAUNCH=1 calabash-ios console

NO_LAUNCH=1 disables the simulator launch. Now if you launch the app in the device and run queries in the terminal it would work.

Running tests on Windows machine

On Windows machine we can run tests only on device and not on simulator(couldnt find a simulator for ios on windows yet).  You can setup Calabash framework on windows using gem install as specified in the calabash ios github wiki page.

Since we cannot build the Xamarin ios project completely on windows without a mac host, we assume that we have a .ipa file built from Mac setup which has the Calabash-framework force loaded. Copy the .ipa file built from Mac to Windows machine where you want to run tests. Connect the device to your windows machine and then open the .ipa file using itunes. It will list the app(say MyApp) under Apps category in itunes and then you can drag and copy it to the device(your device would be listed in the side pane and when you drag the app it will show the connected device and you can drop on the device name and it would install in device). Then you should be able to launch the app in the device and it would also have started the calabash-server. 
And , if you are following the cucumber.yml file(as mentioned in field-service-example), you can modify the ios profile like this,

ios: DEVICE_ENDPOINT=http://[ipofdevice]:37265 NO_LAUNCH=1 DEVICE=[udid] CALABASH_FULL_CONSOLE_OUTPUT=TRUE NO_STOP=1 OS=ios6 PLATFORM=ios -r features/support -r features/ios/support -r features/ios/helpers -r features/step_definitions -r features/ios/pages

and then in command prompt you can run something like(for login feature) cucumber -p ios features/login.feature .

NOTE: I haven't yet figured out how to use the bundle id and have the tests automatically start the app in device yet and if i do so, I will either update this post or enter a new blog to keep track of it.

Happy Testing :)

Saturday, July 13, 2013

Calabash-ios on Xamarin Studio

Calabash-ios is a popular testing framework. In one of my previous posts, I discussed how to setup Calabash-android on windows. Calabash-ios setup on mac is lot simpler to setup if you are using Xcode as out of the box the fast track calabash-ios setup Option is provided which configures the xcode for you. But if you happen to 
use Xamarin studio on Mac, then you have to do manual setup, but its easy to configure. 
Assuming you have successfully setup the Calabash-cucumber gem in your mac machine,
the following are the steps for Xamarin ios project.

1. Download the Calabash-framework in the project directory(i.e the path where your .csproj
file is present). In the Terminal, go to the project directory path and type calabash-ios download.
This would download the Calabash-framework directory which you would use in step 2.

. NOTE: I happen to download from their framework downloads link (calabash.framework-0.9.126.zip
and it didnt work correctly(as of July 13 2013).  Copy the downloaded folder to the project 
directory(i.e the path where your .csproj file is present)

2. In the Xamarin studio, on the IOS project of your app(say Myapp.ios.csproj), you have to 
configure the option to force load the calabash-framework. The reason that we have to do
this for calabash-ios is because the calabash server runs as part of the app itself(rather than
in android the instrumentation server will run on a seperate app). And its better you
configure this in Debug configuration so that release builds does not have this.


In the Additional mtouch arguments, configure
-gcc_flags "-framework CFNetwork -framework CoreGraphics -force_load $(ProjectDir)/calabash.framework/calabash -lstdc++"

3. Now when you run the app on the Iphone simulator, the test server would be started and you can confirm this from the following entry in the output window

2013-07-13 14:21:39.100 FieldServiceiOS[13911:23803] Bonjour Service Published: domain(local.) type(_http._tcp.) name(Calabash Server)

Optionally you can confirm that the server is working by running any query(say query("button") in the calabash-ios console from the Terminal. You would be able to see an output like this

My-MacBook-Pro:Myapp.iOS Me$ calabash-ios console
Running irb...
irb(main):001:0> query("button")
[
    [0] {
              "class" => "UIButton",
               "rect" => {
            "center_x" => 158,
                   "y" => 376,
               "width" => 150,
                   "x" => 83,
            "center_y" => 401.5,
              "height" => 51
        },
              "frame" => {
                 "y" => 358,
             "width" => 150,
                 "x" => 125,
            "height" => 51
        },
             "UIType" => "UIControl",
        "description" => "<UIButton: 0x163cce70; frame = (125 358; 150 51); opaque = NO; autoresize = LM+RM+BM; layer = <CALayer: 0x163cb7d0>>"
    }
]
irb(main):003:0> 

Wednesday, July 3, 2013

Nattable filter for tree grid


Nattable is one of the popular grid available for the eclipse platform which is highly configurable. But there isnt lot of documentation readily available for the grid except for their  Nattable Examples  which has example grid configuration and the corresponding source code. Their support forum on the eclipse community forum is really good and are highly responsive.

One of the examples that's missing in their site is the filter configuration for the tree grid. For the standard grid they have the filter example but not for the tree grid. Even though it can be modified easily for tree grid, this post just makes it readily available. The follwing code block shows only the changes needed on the TreeGridExample source in the Nattable Examples.

Code:

//Wrap the eventlist in a FilterList(import ca.odell.glazedlists.*)
//Here DataRow is the object that is bound to the grid. 
EventList eventList = GlazedLists.eventList( rows );
FilterList filterList = new FilterList<>(eventList);

.....
.....
//change the TreeList to use FilterList instead of TreeList
final TreeList treeList = new TreeList( filterList, new TreeFormat( sortModel ), new TreeExpansionModel() );
.....
.....
.....
//Then create a Filter row layer
ColumnHeaderLayer columnHeaderLayer = new ColumnHeaderLayer( columnHeaderDataLayer, viewportLayer, selectionLayer );
CompositeMatcherEditor autoFilterMatcherEditor = new CompositeMatcherEditor();
   filterList.setMatcherEditor(autoFilterMatcherEditor);
   
FilterRowHeaderComposite filterRowHeaderLayer =
    new FilterRowHeaderComposite(
      new DefaultGlazedListsFilterStrategy(autoFilterMatcherEditor, columnPropertyAccessor, configRegistry),
      columnHeaderLayer, columnHeaderDataProvider, configRegistry
    );
......
//In the SortHeader layer use the filter layer instead of columnheaderlayer
SortHeaderLayer sortHeaderLayer = new SortHeaderLayer<>( filterRowHeaderLayer, sortModel, false );
.........
//Modify hte CornerLayer to use the filter layer
DataLayer cornerDataLayer = new DataLayer( cornerDataProvider );
CornerLayer cornerLayer = new CornerLayer( cornerDataLayer, rowHeaderLayer, filterRowHeaderLayer );
// Note that the column header layer is the filterRowHeaderLayer
GridLayer gridLayer = new GridLayer( viewportLayer, filterRowHeaderLayer, rowHeaderLayer, cornerLayer);
   
Now if you run with these modifications on the example code as an RCP or Eclipe plugin, you will see a filter row on the tree grid.

Monday, July 1, 2013

Android Automation Testing


After evaluating couple of automation testing platforms(like Robotium, Ranorex etc), I found Calabash  the simplest platform that supports cross platform mobile application automation testing. Another requirement I had was to have the ability to test applications developed using the Mono for Android/ IOS frameworks.  Calabash comes in two flavors Calabash-Android and Calabash-IOS and it also had the option to test in the cloud environment through less-painful which apparently had been acquired by Xamarin.  This post covers only the details of setting up the test environment for Android apps.

Calabash-Android


Calabash supports behavior driven test case development using Cucumber. While the high level test case can be written using predefined step definitions in Cucumber, more complex steps can be defined in Ruby. Calabash-Android provides lot of predefined steps that supports lot of input steps, gestures, touch, snapshot etc. 

Installation


  1. The first step is to setup Ruby. At the time of writing this post(July 1st 2013), Ruby 1.9.3 is the version supported by Calabash-Android. When Installing Ruby make sure the installed directory is set in the environment path(the last step in the installer prompts for this)
  2. After installing Ruby 1.9.3,  install the Development kit.  Download the correct version of development kit as defined in the Ruby download page. For Ruby 1.8.6 to 1.9.3,  tdm-32-4.5.2 is the suggested devkit.
  3. Follow the detailed instructions as given here to setup the devkit. Its basically these steps
    • Extracting the Devkit installer(7-zip archive) to a <Install> directory.
    • In the Cmd prompt, enter Cd <Install> , where <Install> is the extracted directory in the previous step
    • Then enter, ruby dk.rb init . This would generate the config.yml file which has details about the installed ruby packages on the system. You can verify that the  Ruby 1.9.3 is present in this file
    •  Then enter ruby dk.rb install to finalize the devkit installation
  4. The next step is to install the Calabash-android gem. Enter gem install calabash-android in the cmd prompt.
Testing the App

Now that the Calabash-android framework is installed and setup the next step is to get the App ready to test. Calabash-Android provides a command utility to easily set up the test project for the app.

In the cmd prompt, enter the directory in which you want to store the test cases. Let this be the <TestDir>.  
  • Enter cd <TestDir> in the Cmd prompt. 
  • Then type calabash-android gen  to generate the stub files for the test cases. it would generate the files in this format
features
|_support
| |_app_installation_hooks.rb
| |_app_life_cycle_hooks.rb
| |_env.rb
|_step_definitions
| |_calabash_steps.rb
|_my_first.feature
The .feature file will have the cucumber style test case like this
Feature: Login feature

  Scenario: As a valid user I can log into my app
    When I press "Login"
    Then I see "Welcome to MyApp"
Assuming your app has the welcome screen with Login button and the welcome text,        running the login feature test case would succeed without any changes. But typically you 
would want to change the login feature file by providing valid login credentials and ensuring that we see the success message. You can achieve this with the Predefined Steps defined by   the calabash framework. Assuming you have gone through the calabash android framework fair enough and wrote the required steps to validate the login scenario of your app,  you have to sign the .apk file(say com.fun.myapp.apk) with the debug key to test the app.  
The following steps need to be followed to run the test
  • To help the setup process easier, set the Java SDK path and the Android SDK path in the JAVA_HOME and ANDROID_HOME variables.
  • type the following cmd,
cd %JAVA_HOME%\bin jarsigner.exe -verbose -sigalg MD5withRSA -digestalg SHA1 -keystore debug.keystore -storepass android -keypass android %~dp0\com.fun.myapp.apk androiddebugkey
  • 3. Allign the .apk file with the following comman
cd %ANDROID_HOME%\tools\ zipalign -v 4 %~dp0\com.fun.myapp.apk %~dp0\com.fun.myapp_allign.apk
  • 4. Run the tests and export the report to .html file and also logging the output in the console
calabash-android run com.fun.myapp_allign.apk --format html --out report.html --format pretty
You can combine all these steps in a batch to make it convenient to run each time. here is a snapshot of the batch file
Now you should be able to see the output in either the report.html file or in the console. Their report format is really cool and it shows the list of features run and what succeeded and failed with color highlights.

Monday, May 27, 2013

Eclipse and XDebug


PHP Debugging in Eclipse

I have googled my way through many different forums and faced many problems in configuring Eclipse for PHP debugging. So this post is to document the steps so that its easier for any newbie to look and follow through.
  • Install Eclipse June(4.2.x) from the Eclipse site. Download the classic version http://www.eclipse.org/downloads/download.php?file=/eclipse/downloads/drops4/R-4.2.2-201302041200/eclipse-SDK-4.2.2-win32-x86_64.zip * Install the PHP Development tools plugin. In the Eclipse IDE, go to Help->Install New Software-> Add http://download.eclipse.org/tools/pdt/updates/release
  • Now the PHP development environment is setup.
  • To setup a local server, we can use the Xampp server which has the Apache, PHP, MySQL in a single package. Download it fromhttp://www.apachefriends.org/download.php?xampp-win32-1.8.1-VC9.zip . Note that this is an extractable copy which you can directly use without installing. (You can copy it extract the Zip file and copy the Xamp directory to C:\)
  • We have to configure the php ini file for xdebug. Go to C:\xampp\php\php.ini and go to the end of the while where Zend extension is configured. We have to correct it with C:\ path like this zend_extension = “C:\xampp\php\ext\php_xdebug.dll” Since this is important configuration details I am pasting the XDebug configuration below. Except the zend_extension and xdebug.remote_enable are commented and unused for now. (We can use other parameters if we want to set up remote debug).
  •  [XDebug]
    zend_extension = "C:\xampp\php\ext\php_xdebug.dll" 
    ;xdebug.profiler_append = 0
    ;xdebug.profiler_enable = 1
    ;xdebug.profiler_enable_trigger = 0
    ;xdebug.profiler_output_dir = "\xampp\tmp" 
    ;xdebug.profiler_output_name = "cachegrind.out.%t-%s" 
    xdebug.remote_enable = 1
    ;xdebug.remote_handler = "dbgp" 
    ;xdebug.remote_host = "127.0.0.1" 
    ;xdebug.trace_output_dir = "\xampp\tmp"
  • Go to C:\xampp and double click on xampp-control.ext. Choose language/country and then it will show a control panel to start/stop server. Start Apache server from there.

Create a new PHP project

  • Then start the Eclipse IDE with workspace as C:\xampp\htdocs.
  • Create New PHP project. (From File->New->PHP->PHP Project and give a name say MySite and click Finish). Since this is the first time we are creating PHP file, it will prompt to open PDT perspective and choose Ok.
  • Create a new PHP file by right clicking on the project folder in PHP Explorer. New->PHP File and name it as test.php. You can add a sample code in test.php file to test
    <?php
    $a =20;
    echo $a;
    ?>
    .
  • Now we have to setup the debugger to use XDebug. Go to menu Window->Preferences->PHP->Debug and under Debug Settings Choose XDebug as the PHP Debugger instead of Zend. Click Apply and Ok.
  • Right click on the test.php file and choose Debug As-> PHP Web Application. It will show a dialog with the URL and Click Ok. Now it will break in the first line of the PHP file. You can also set breakpoints in the php file before starting the execution and it will break at breakpoints